Budget Grow Gear: Repurposing Household Items to Grow Cannabis Cheap
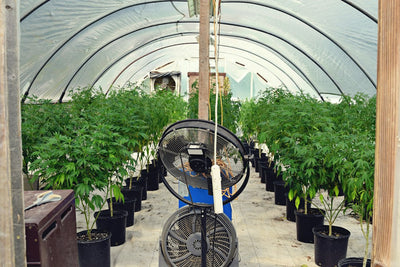
Photo by CRYSTALWEED cannabis via Unsplash.
A basic grow tent kit -- tent, light, fan, ducting -- runs $290 to $770+ depending on size and light quality. Meanwhile there's a decent chance you already own everything you need to get a plant or two through veg: an unused closet, a couple of plastic totes from the garage, maybe a desk lamp gathering dust in a spare room. The gap between "buy a kit" and "build one from what's around the house" is real, and for a first grow or a budget-conscious grower, it's worth closing that gap before opening your wallet.
This isn't a shortcut on the plant itself. Cutting corners on genetics -- grabbing whatever cheap, unstable seeds are on sale -- is how budget grows fail. Cutting corners on the box the plant lives in is a different matter entirely, and it's where real money gets saved without touching your yield or potency ceiling. A closet lined with reflective sheeting and a decent LED will grow the same bud as a $600 tent, because the plant doesn't care what the walls are made of. It cares about light, air, and root space.
Before you drill a single hole in a bucket, though, figure out whether home cultivation is legal where you live. That single fact determines your plant count, your space requirements, and honestly whether any of this is worth building at all. From there, this piece walks through free grow space, free containers, budget lighting that actually performs, and the specific points -- humidity control and structural reliability, mainly -- where DIY genuinely runs out of road.
Check the legal picture before you build anything

Photo by plumerl via Pixabay.
As of early 2026, roughly 24 states plus Washington D.C. allow some form of home cannabis cultivation. The rest either require you to buy exclusively from a licensed dispensary or prohibit cannabis outright. This isn't a minor technicality -- it's the single fact that determines whether anything else in this article applies to your situation, so confirm your state's current rule before you invest time or money in a grow space.
Where home grows are legal, the typical structure allows six plants per adult in the household, with a separate limit on how many of those can be in flower at once, and most states cap the household total at 12 plants no matter how many adults live there. That household cap matters if you're sharing a space with a partner or roommates who also want to grow -- you don't each get your own six on top of theirs.
These numbers aren't static. Washington State legalized recreational retail sales back in 2012 but, remarkably, still bans home cultivation entirely as of 2026 -- though a bill introduced in January 2026 would finally allow six plants per adult if it passes. Ohio moved the opposite direction, cutting its home-grow allowance from 12 plants down to 6 under Senate Bill 56 in 2026. If you built your grow room around last year's plant count, check again -- these limits shift with the legislative session, not with the growing season.
There's also a seed-sourcing wrinkle worth knowing about. A federal hemp-seed rule taking effect November 12, 2026 closes the loophole that let some interstate sellers ship seeds as "hemp" regardless of the plant's eventual THC output -- seeds that would grow into a plant testing over 0.3% total THC no longer qualify as a legal hemp product under that rule. If you've been sourcing cheap seeds through that channel, expect it to tighten up, and buy from a source that's straightforward about what you're actually getting.
Free grow space: closets, cupboards, cellars, and old PC towers

Photo by stevepb via Pixabay.
The cheapest grow space is one you already own. A spare closet, a deep cupboard, or an unused corner of a cellar all work as a grow room once you handle two things: sealing it against light leaks and lining it with something reflective. Light leaking into a flowering room during the dark period can stress plants into re-vegging or hermaphroditing, so this step isn't cosmetic -- it protects the crop.
Reflective Mylar sheeting or even plain white plastic sheeting costs a few dollars a roll and makes a bigger difference than people expect. Bare drywall or wood absorbs a surprising amount of light; wrap the same space in Mylar or white poly and you'll see noticeably better light distribution to the lower canopy without adding a single watt. It's the best return on investment in this entire list.
If you don't have spare room space at all, an old dead computer tower is a legitimately good micro grow box for a single small plant. Gut it completely, drill a few vent holes for a small fan, line the interior with white paint or reflective tape, and you've got a stealthy, contained space that fits in a closet or under a desk. It won't hold a full-size plant, but for a single low-stress-trained plant kept short, it works.
Whatever space you choose, airflow is non-negotiable. You need an intake point and an exhaust point, even if that's just a small clip fan pulling air in through one drilled hole and a passive vent letting it out another. A sealed box with no airflow path will cook your plant in a heat spike and breed mold on any wet leaf or bud within days. Ventilation isn't optional in a repurposed space the way it might feel optional in a manufactured tent with built-in vents.
Match your space to your legal plant count before you commit to a layout. There's no point building a four-plant closet setup in a state that caps you at two plants in flower at once -- figure out the legal ceiling first, then size the space to it.
Building a DIY tent from PVC and panda film

Photo by Suraaj M via Unsplash.
If you want the tent form factor without the tent price, PVC pipe gets you there. Cut standard 1/2-inch or 3/4-inch PVC into lengths, join them with elbow and T-connectors, and you've built the same rectangular skeleton a $300 manufactured tent uses -- for the cost of a few sticks of pipe and a bag of connectors, usually under $30 total.
Panda film is the fabric that makes this work: black on one side to block light, white or reflective on the other to bounce it back onto the canopy. Wrap it around your PVC frame and seal the seams with duct tape, or use binder clips if you want something you can reposition without re-taping every time. Either method holds up fine for a single grow cycle.
For access, run a strip of Velcro along one seam instead of taping it shut completely. That gives you a resealable flap you can open and close daily, functioning like the zippered door on a real tent, without needing to re-tape the whole panel every time you check on the plant.
The nice thing about building your own frame is that it scales exactly to your situation. Build a 2x2 for a single plant in a bedroom corner, a 3x3 for a couple of plants, or a full 4x4 if your state's plant limit and your floor space both allow it. You're not locked into whatever sizes a manufacturer happens to sell that year.
Just be honest about the limits. A taped-and-clipped PVC-and-panda-film build will never be as light-tight or as rigid as a manufactured tent with sewn seams and a metal frame. Before you trust it to run a photoperiod schedule -- 12/12 for flowering, for instance -- turn all the lights off, close yourself inside or check it from outside at night, and look for any light leaking through a seam or gap. Fix every leak you find. A stray light leak during the dark period is one of the more common ways a DIY tent grower runs into flowering problems that a manufactured tent wouldn't have.
Buckets and totes: free pots that actually work

Photo by Alfo Medeiros via Pexels.
A 5-gallon bucket or a plastic storage tote with drainage holes drilled in the bottom is a genuinely functional fabric-pot substitute, and it costs close to nothing if you've already got one sitting in a garage or under a sink. This is one of the easiest wins in a repurposed setup -- there's very little performance you're giving up compared to a purchased fabric pot.
Drill 8 to 12 holes roughly 1/2 inch across the bottom for drainage. If the container is deep enough to hold standing water around the lower root zone, add a few more holes lower on the sides as well -- you want water moving through and out, not pooling at the bottom where roots sit in it.
Whatever you drill, you'll need something underneath to catch runoff. A plant saucer works if it's sized right, but a repurposed baking tray or the uncut lid from a second tote does the same job for free. Don't skip this step -- runoff on a closet floor or carpet is how a budget grow turns into a bigger cleanup project than it needed to be.
The one real tradeoff versus a fabric pot: buckets and totes don't breathe. Fabric pots air-prune roots at the container wall, which keeps the root system branching instead of circling. A solid-walled bucket doesn't do that, so roots are more prone to circling the inside wall and potentially girdling themselves over a longer grow. If you're reusing the same bucket across multiple cycles, check the root ball when you dump it out -- if you're seeing a dense wall of circling roots, it's worth transplanting a size up earlier next time or cutting a few extra drainage/aeration slits partway up the sides.
Last thing, and it matters: rinse out anything that previously held chemicals, cleaning products, or food with strong residue before you put a root zone in it. A tote that held pool chemicals or a bucket that had joint compound in it isn't something you want leaching into soil your plant's roots are sitting in. A thorough rinse and a day of air-drying handles most of this, but skip it entirely for anything you can't verify was food-safe or chemical-free.
Lighting on a budget: what actually works and what doesn't

Budget grow kit costs vary widely, ranging from about $115 for a bare-bones HPS setup to $770 for a larger LED kit—nearly seven times more expensive.
Natural sunlight is roughly four times stronger than a heavy-duty 1000-watt LED grow light. That's not a knock on LEDs -- it's just a reminder that a bright, south-facing windowsill with several hours of direct sun a day is a completely legitimate free light source for a small plant, especially through veg. If you've got the window, use it before you spend money replacing it.
A standard household bulb in the 20-100 watt range, or a basic desk lamp, can supplement that windowsill setup on cloudy days or to stretch the light period slightly. But be realistic about what it can and can't do -- it's a boost, not a replacement. A desk lamp alone will not carry a plant through a full flowering cycle with dense, well-formed buds. Treat it as backup light for veg, not a primary flowering source.
Once you're ready to buy an actual grow light, costs vary a lot depending on how bare-bones you're willing to go. 2026 pricing guides list complete tent-and-light-and-fan kits running from about $290 for a 100-watt LED setup up to $770 or more for larger, higher-output builds. On the other end, growers have put together a genuinely functional bare-bones setup -- including an old-school HPS fixture -- for around $110 to $120 by sourcing used equipment and skipping the tent entirely.
Heat is the real risk in budget lighting, more than most people expect. Older HPS fixtures run hot, and even LED drivers packed into a sealed DIY box without proper airflow raise fire risk in a way a manufactured tent's engineered vents are designed to prevent. Any repurposed light needs its own dedicated exhaust path, and it should never directly touch panda film or Mylar -- both can scorch or, worse, ignite against a hot fixture. Give every light breathing room and a fan pulling heat away from it.
If you're stretching a tight budget across every part of this build, put the money toward the light first. A great tent with a weak light will underperform. A cardboard box with a genuinely decent LED will outproduce it every time -- light is the input that actually drives yield and potency, and it's the one place a repurposed build shouldn't cut corners.
Where DIY hacks fall short: humidity control and structural reliability

Photo by Peter Klauss via Pexels.
Growers on forums like THCFarmer specifically warn against running a household dehumidifier or humidifier inside a tent, repurposed or otherwise, and it's advice worth taking seriously. Cannabis needs relatively tight, narrow humidity targets that shift through the grow -- roughly 65-70% RH in early veg down to 40-50% by mid-flower and lower still in late flower -- and consumer humidity units built for a bedroom or basement aren't designed to cycle that precisely inside a small, sealed tent volume.
The consequence is specific and costly: a household humidifier that overshoots its target by even 10 to 15% RH for a few hours during late flower is enough to trigger bud rot in dense colas. That's not a slow, forgiving failure -- botrytis can take hold inside a tight cola and you won't see it until you're already cutting moldy bud off an otherwise good plant. This is arguably the single biggest way a budget grow loses a crop it had no business losing.
Structural reliability is the second place DIY hits its ceiling. A manufactured tent's welded frame and sewn fabric are built to carry the weight of a hung light, ducting, and a fan for weeks without shifting. Taped PVC joints and duct-taped or clipped panda film weren't engineered for sustained load -- they can sag under a hung light's weight or tear at a seam over a multi-week flowering run, sometimes at the worst possible moment, like collapsing onto a plant two weeks from harvest.
Given all that, there's one purchase worth making even in an otherwise fully repurposed setup: a cheap combination hygrometer and thermometer. It costs $10-15 and it's the difference between knowing your humidity and guessing at it. Guessing is how DIY grows lose a crop late, quietly, after months of otherwise good work.
The practical takeaway: treat repurposed gear as genuinely good for vegetative growth and for small personal-use plants where a little environmental drift doesn't cost you much. Once flowering starts, budget for at least one or two purpose-built components -- a real grow light, a proper inline fan, or an actual humidity controller -- rather than trying to repurpose your way through the stage where mistakes actually show up in the final product.
Add it up and a repurposed setup -- closet space, a drilled bucket, PVC-and-panda-film walls, a decent used light -- gets you a real, working grow for well under $150 if you're willing to build instead of buy. But be clear-eyed about where those savings actually come from: they come from how forgiving vegetative growth is. A plant in veg tolerates an imperfect light, a slightly leaky tent, a bucket instead of a fabric pot, and shrugs it off. Flowering is a different animal, and it's where cheap shortcuts on humidity control, light quality, and structural stability get punished in the form of mold, stretch, and disappointing bud density.
None of that changes the one input that matters more than the box the plant lives in: the genetics you start with. Well-bred seeds handle a slightly imperfect environment -- a few degrees off target, a humidity swing you didn't catch fast enough -- far better than finicky, unstable genetics ever will under the same conditions. If you're building a bare-bones setup and looking for the one place to actually spend real money, spend it there. Quality genetics from a source that stands behind what it sells is worth more to your final yield and potency than any tent upgrade.
And none of it matters if it isn't legal where you live. Check your state's current plant-count rules before you build anything -- not last year's rules, this year's, given how much the legal landscape has shifted state to state through 2026. A beautifully built DIY tent housing six healthy plants is worthless, and worse than worthless, if six plants isn't what your state actually allows.
Sources
- How to build the best DIY indoor cannabis grow room on a budget
- tips on creating a budget friendly cannabis grow - share your wisdom - THCFarmer
- DIY: Cheap Indoor Grow Setup a Low Budget Grow Room
- How to Grow Weed on a Budget: Indoors and Outdoors - RQS Blog
- Guide To Building Your DIY Indoor Cannabis Grow Room