Setting Up a Simple Home Breeding Program in a Grow Tent
Photo by CRYSTALWEED cannabis via Unsplash.
You don't need a warehouse, a lab coat, or a genetics degree to start breeding cannabis. You need a 4x4 tent, a second small space to isolate a male, and the patience to run a plant through a full life cycle twice before you see what you actually made. That's the whole barrier to entry, and it's a lot lower than most home growers assume.
Most people who grow their own never touch breeding because the idea sounds industrial -- pollen chambers, tissue culture, rows of numbered plants under metal halide. In practice, home breeding is closer to seed saving with better records. It requires isolation so pollen doesn't go where you don't want it, timing so you catch the pollen and the receptive female at the right moment, and a notebook (or spreadsheet) you actually update. That's it. The skill ceiling is high if you want to chase it, but the floor is within reach of anyone who's already run a couple of successful grows.
The appeal is pretty specific once you've grown for a while. Maybe one plant in a pack of ten turned out exactly right -- structure, smell, the way it finished -- and you want more of exactly that, not a fresh gamble on new seeds. Maybe you just want to understand how traits move from one generation to the next instead of treating your plants as a black box. Either way, before any of this, sort out whether you're legally allowed to grow at home at all, because that answer varies enormously depending on which state you're in, and breeding adds a wrinkle -- running males and females together -- that plain grow-your-own rules don't always anticipate.
Know Your Legal Ground Before You Start
Home cultivation itself still isn't universal, even in states where cannabis is fully legal to buy. As of 2026, 25 markets -- 24 states plus D.C. -- permit home grow, which works out to roughly 61% of all legal cannabis markets in the country. That still leaves a sizable share of places with a functioning adult-use or medical market that don't let residents grow a single plant at home, let alone breed.
Delaware, New Jersey, and Washington are the clearest examples of the gap: all three allow adult-use retail purchase, but none of them permit home cultivation for adult-use consumers. Illinois splits the difference -- home grow exists, but only for registered medical patients, so a recreational buyer there is in the same position as someone in a state with no home grow law at all.
Where home grow is legal, plant counts differ enough to actually shape what kind of breeding project is realistic. California's Prop 64 allows 12 plants per household for adults 21 and older, regardless of how many adults live there. Ohio's 2026 framework allows 6 plants per residence, or 12 if there are two or more adults in the household. Washington's HB 1019 brings home grow online starting July 1, 2025, capped at 6 plants. Oregon is the tightest of the bunch: 4 plants total per household, full stop, no matter how many adults live there.
That Oregon number matters more than it looks like on paper. A basic breeding cross needs at least one male and enough females to make selections from -- realistically 3 to 5 plants minimum if you want any room to choose the best mother. A 4-plant household cap barely covers that math once you factor in keeping a male isolated and running any females at all for comparison. If you're in a low-count state, your breeding plan needs to be scaled down from the start, not adjusted after you've already started flowering.
Before you commit tent space, time, and money to a breeding project, look up your specific state's current plant limits -- they get revised more often than people expect. Pennsylvania, Florida, and Maryland reportedly have home-grow legislation in play for 2026, so if you're in one of those states, it's worth checking the current status rather than assuming last year's answer still holds.
The Isolation Tent: Your Breeding Room's Most Important Piece of Gear
Cannabis pollen is airborne, and airborne pollen does not respect the boundaries of your grow room. A single mature male in bloom can shed enough pollen over a few days to seed every unprotected female within range, including ones in a different tent if your ventilation lines connect them. This is the entire reason a dedicated isolation tent exists -- it's not an optional upgrade, it's the mechanism that makes controlled breeding possible in the first place.
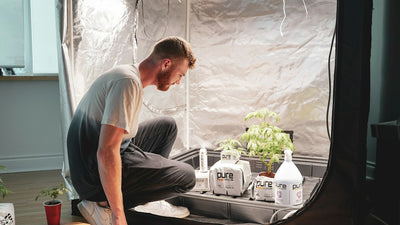
The standard setup for a home breeder is a second, smaller tent -- a 4x4 works fine for this -- run alongside your main production tent but kept completely physically separate. Different room, different closet, whatever you've got, as long as air isn't moving between the two spaces. Some growers get away with distance and airflow management in a single large room, but a sealed second tent removes the guesswork entirely, which matters a lot the first few times you do this.
It helps to run your breeding tent on roughly the same nutrient schedule as your production room. Seeds inherit genetics, not feeding history, but if you're evaluating vigor and growth rate in your F1 seedlings later, you want that data collected under conditions that resemble what you'll actually grow in -- otherwise you're comparing plants raised in different environments and mistaking environmental variation for genetic variation.
- A fully sealed tent with taped seams -- pollen finds gaps you didn't know existed.
- A dedicated inline fan and carbon filter that does not share ducting with your main grow's exhaust.
- A separate set of tools, gloves, and even a jacket or apron you only wear in the breeding tent, since pollen clings to fabric and hair and travels on you just as easily as on air currents.
Keep the male isolated in his own space right up until the moment you're ready to collect pollen for an intentional cross. Don't let him share airspace with females you're not actively trying to pollinate, even briefly -- an afternoon of shared ventilation is enough to seed a crop you were planning to harvest sinsemilla.
Collecting and Using Pollen Without Making a Mess of Your Whole Grow
Timing the pollen harvest is the part beginners tend to get wrong in one of two directions -- either too early, when the sacs haven't opened enough to yield much, or too late, after most of it has already shed into the tent. The sweet spot is 2 to 3 days after the first pollen sacs crack open. That's the peak shedding window, when you'll get the most viable pollen with the least waste.
Collection doesn't require special equipment. Bend the pollen-heavy branch gently over a clean sheet of paper, or work it into a paper bag, and tap the branch to knock pollen loose. It falls as a fine yellow-green dust -- more than people expect from a single branch. Once collected, tap it into a small sealed container (a film canister or a labeled glass vial both work) and get it out of open air quickly, since pollen loses viability fast once exposed to humidity and light.
Short-term storage just means cool, dry, and dark -- a drawer or cabinet away from the tent works for a cross you're making within a week or two. If you want to hold pollen longer, freeze it with a small packet of desiccant in the container to control moisture, which can extend viability considerably. Whatever you do, label the container immediately with the date and the parent plant's name or number. Unlabeled pollen a month from now is just yellow dust with no story.
To pollinate, use a small artist's brush or your fingertip to dab pollen directly onto the pistils of the female branches you've selected for that cross. Once you've applied it, bag that branch loosely with a paper or plastic bag for a day or two to keep stray pollen from drifting to the rest of the plant or the tent. Tag every pollinated branch with a tie or marker and log which male pollinated it and on what date -- this is the detail that turns a batch of random bag seed into an actual documented cross you can repeat or evaluate later.
Once you're done, ventilate the tent thoroughly and wipe down surfaces before you go back to normal grow work nearby. Residual pollen sitting on a fan leaf or tent wall can cause a surprise seed set weeks later if you're not careful about cleanup.
Backcrossing, Stabilization, and Reading F2 Variation

Photo by CRYSTALWEED cannabis via Unsplash.
Once you've made a first cross, the real work of breeding starts -- deciding what to do with the F1 seeds you get. A backcross, or BX, means taking one of those F1 offspring and breeding it back to one of its original parents. This reinforces specific traits from that parent -- resin production, terpene profile, structure -- pulling the offspring's genetics closer to a plant you already know well, rather than letting them drift toward the unknown middle ground between two parents.
Stabilization is a slower, generational project. It happens by selfing a line -- breeding a plant with itself or a genetically similar sibling -- across several generations, narrowing the gene pool each time so that offspring become more predictable and uniform. This is why stable, established strains behave consistently from seed while a fresh F1 cross can throw a wide range of results.
That range shows up hardest in the F2 generation. F1 plants tend to look fairly uniform because dominant traits from the cross tend to mask recessive ones. Self or sibling-cross those F1s to get F2 seed, though, and recessive traits that were hidden start surfacing -- different leaf structure, different flowering times, different smells, sometimes traits neither visible parent showed. It can look chaotic if you're not expecting it, but that variation is the raw material breeding actually works with.
Hunting F2s means growing out a full batch -- more plants than you'd normally run, if your plant count allows it -- and picking out the standouts based on whatever you're actually breeding for: structure, aroma, resin coverage, vigor, disease resistance. Those selected individuals get carried forward into F3, and you repeat the culling process, tightening the population toward the traits you want and eliminating the ones you don't.
A useful benchmark for real progress by F3 is uniformity in flowering time -- growers generally aim for a population that finishes within a five-day window of each other. That kind of consistency is what makes a harvest schedule predictable instead of a plant-by-plant guessing game.
If all of this sounds like a lot for a first project, S1 seed is the easiest entry point. It's made by pollinating a single female clone with pollen derived from that same plant (through techniques like colloidal silver treatment), so no separate male is needed at all. The offspring carry only that one mother's genetics -- no second parent, no surprise cross, just a reliable way to preserve a phenotype you already like.
Testing Germination and Deciding When to Scale Up

Stabilized F3+ seed lines tend to achieve the highest germination rates, generally surpassing both the 85% target minimum and the lower rates often seen in typical F1 crosses.
Before you scale any cross into more tent space, test it. Take a sample of the seeds from a given cross -- 20 to 50 is a good working number -- and run a straightforward germination test using either the paper towel method or direct-to-soil, tracking how many sprout and on what day. You're looking for a germination rate above 85% before you commit more plants, more time, and more tent real estate to that particular line.
If germination comes in low, don't automatically write off the cross genetically. Poor results usually trace back to something mechanical: seeds harvested before they were fully mature, pollen that had already lost viability by the time it was applied, or seed collected too early in the flowering cycle before the shells had hardened properly. A cross with great genetic potential can still produce a bad germination batch if the collection timing was off -- worth troubleshooting your process before you assume the parents were a mismatch.
- Parent plants used, with any ID numbers or names you're tracking them under
- Pollination date and the branch or plant that was pollinated
- Total seed count harvested from that cross
- Germination rate from your test batch
- Notable phenotype traits observed in seedlings and, later, in mature plants
That log is the actual product of a home breeding program, arguably more than the seeds themselves. Over a few seasons it becomes a record you can look back on to see which crosses are worth repeating, which need another generation of selection, and which just didn't pan out.
Only move a cross into your main production tent once it's proven itself on both fronts -- consistent germination and the traits you were actually breeding for showing up reliably across the sample batch, not just in one lucky plant. Starting from quality, well-bred stock -- seeds from a reputable source with a documented lineage -- makes every step of this faster, since you're not spending your first two generations just fighting instability that was baked in from the start.
Strip away the tents, the lighting, and the pollen brushes, and home breeding is mostly a paperwork discipline wearing a horticultural costume. The growers who end up with something worth keeping are the ones who wrote down every pollination date and germination rate, not the ones who happened to have the nicest setup. A 4x4 tent and a notebook will outperform a warehouse with no records, every time.
If you're starting from zero, resist the urge to run five different crosses in one small space just because you technically have room. Pick one male, a handful of females, and one specific trait or goal you're breeding toward -- better resin, tighter node spacing, a faster finish, whatever matters to you. A single, well-documented cross teaches you more than five sloppy ones ever will, and it's far easier to troubleshoot when something doesn't go as expected.
And go in expecting your first few crosses to be learning runs, not finished strains. Your results depend on the quality of your starting genetics, your climate and setup, and how consistent you manage to be from one generation to the next -- none of which you'll have fully dialed in on attempt one. That's fine. Treat the first cross as the plant that teaches you your own process, keep the records, and let the second and third crosses be the ones that actually deliver what you were after.
Sources
- Weed Grow Tent Kits The Ultimate 2026 Guide
- Complete Guide to Grow Tents for Cannabis | Grow Weed Easy
- Home Growing Cannabis in 2026: Every State Law, Plant Limit, and Beginner Tip You Need | Budpedia
- Cannabis Breeding Techniques 2026: Custom Strains Guide – Buy Weed Seeds
- The Home Growers Guide to Cannabis Breeding. - RQS Blog